Adding Users
If you have the Create User function, you can create additional User IDs for your organization.
Access the Users page by selecting Users from the Admin drop-down. The Users page will display. Click Create User.

There are two tabs you need to complete for each new user:
General Information Tab
Account Access Tab
General Information Tab
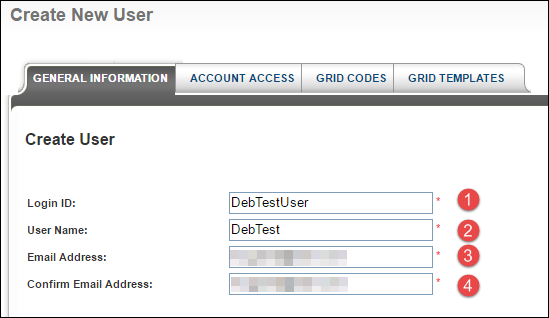
The Create New User page displays. Complete the following fields in the top portion of the page under the General Information tab:
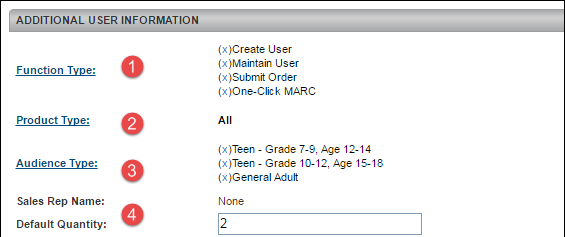
Complete the following fields in the bottom portion of the page under the Additional User Information heading:
Complete the following fields in the bottom portion of the page under the Additional User Information heading:
When you have finished your changes, click the Save button at the bottom of the page. You will receive the below success message:

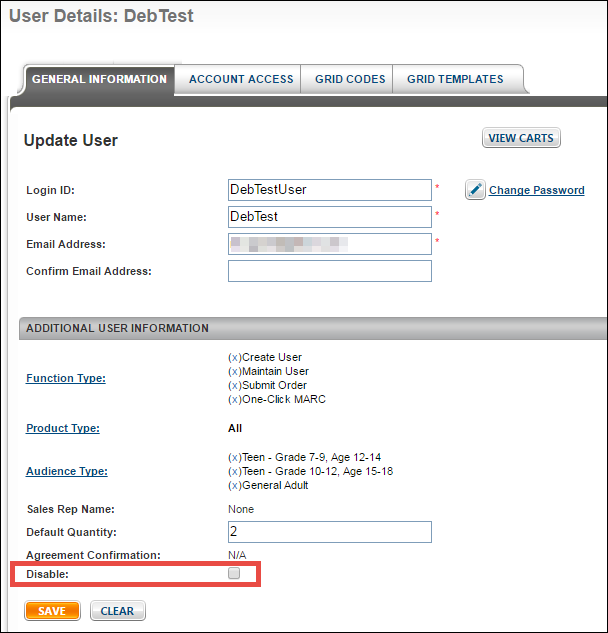
Once you have successfully saved the user, you will notice a new option, Disable, at the bottom of the page. If at any point you wish to disable this user and prevent them from working within the system, select this option and then click Save.
Please note that if you ever need to change a password for a user, you can do so by clicking Change Password on the General Information tab.
Account Access Tab
There are two tabs you need to complete for each new user:
General Information Tab
Account Access Tab
General Information Tab
The Create New User page displays. Complete the following fields in the top portion of the page under the General Information tab:
- Login ID - Enter a unique Login ID in this field. The information entered here will be required to log in to the system. No special characters or blank spaces are allowed.
- User Name - Enter a unique User Name in this field.
- Email Address - Enter the new user's email address. The user's temporary password will be sent to this address.
- Confirm Email Address - Enter the user's email address one more time to ensure that it matches what is in the Email Address field above
Complete the following fields in the bottom portion of the page under the Additional User Information heading:
Complete the following fields in the bottom portion of the page under the Additional User Information heading:
- (1) Function Type - Assign system functions to the user by clicking on the Function Type link. The Select Functions pop-up page will display. Select each function you wish to give this user access to on the pop-up page. Functions are explained below the image.
- Support Organization - Gives access to General Information, Premium Services (Read Only), Carts List, Grid Codes, MARC Profiles, and Shared Groups options under the Admin drop-down field. Grid Codes and MARC Profiles will only be available if the user's organization has access to these features.
- Create User - Can create users in Admin via the Users option under the Admin drop-down field. If your organization has used up all available user IDs, the Create User button will be grayed out. You can request more IDs if needed.
- Maintain User - Can edit existing users in Admin via the Users drop-down field. Cannot create new users.
- Submit Order - Select to give the user a Submit Order button.
- One-Click MARC - Gives the user the ability to use One-Click MARC Record Downloads. This option is only available for organizations that have the One-Click MARC premium service.
- ESP Access - Lets the user submit a cart for ESP ranking and distributon. This option is only available for organizations that have the ESP premium service.
- Request Quotes - Lets the user request a quote by using the Submit Order button. This option is only available for organizations that have access to Quotations.
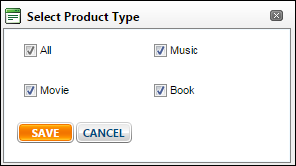
- (2) Product Type - Determines the product types visible in search results. Click on the Product Type link to open the Select Product Type pop-up screen. Select only the product types you wish for this user to be able to view when performing searches.
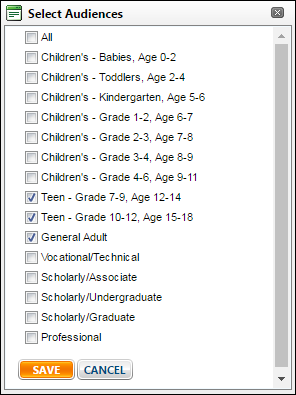
- (3) Audience Type - Determines the audience types available for viewing in search results. Audience types only applies to Book products. For instance, if you are creating a user who will be a children's book selector, you may want to only give them access to books that have an audience level of Children's. In the below example, only books with Teen and General Audience levels will display in search results.
- (4) Default Quantity - Enter the default quantity you wish to have this user apply automatically to orders. The Default Quantity can be overridden at the item level, and can be changed within My Preferences.
When you have finished your changes, click the Save button at the bottom of the page. You will receive the below success message:
Once you have successfully saved the user, you will notice a new option, Disable, at the bottom of the page. If at any point you wish to disable this user and prevent them from working within the system, select this option and then click Save.
Please note that if you ever need to change a password for a user, you can do so by clicking Change Password on the General Information tab.
Account Access Tab
Assign accounts to the new user on the Account Access tab. Accounts within your organization will display automatically by default when you access this tab. For each account type, you can determine whether or not you want this user to be able to Create Carts, and/or View Orders by selecting the appropriate option next to each account.
Next, determine which account should be assigned as a default account at the bottom of the page by picking the appropriate account from the associated drop-down field. Click Save to save these changes.
Top of Page